Royal Tiara – Princess Pie
Makes two six inch mini pies, single crust, cream filling. Total prep
You can eat me.
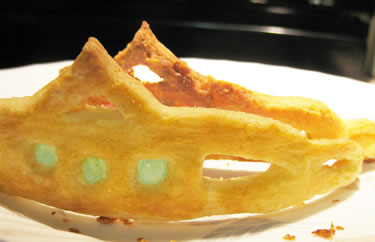
A Tiara made from a buttery pastry that can be eaten.
This innovative pie is a great gift for your young lady.
How about Wedding favors.
This tiara is for my girl. She likes it when I call her my little princess, and she really is my princess. So I made her a tiara pie. Now she is royalty.
What is the Royal Tiara Pie?
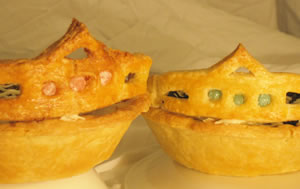
The Royal Tiara Pie is very delicate and flaky. It is lightly sweetened with a white chocolate creamy filling. And the most important thing to know is that the pie is a real princess tiara that forms the pie’s edges. The tiara can be removed and worn on the head.
I got the inspiration from Jim’s Pancakes
and of William and Kates Royal Wedding
to do this for my lovely daughter.
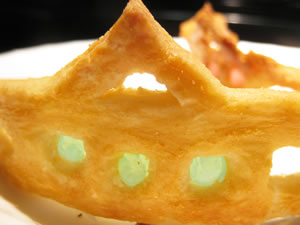
A flaky butter pie pastry is used for this royal tiara pie. It is filled with a vanilla cream mixed in with a raspberry syrup. The jewels of the tiara are blue and pink jelly beans (Jelly Belly) that were softened and set into the holes.
Being a princess-
We both know being a princess is more than being beautiful, wearing fashion, having expensive jewelry and getting a handsome prince. These things are just the outward appearance.
What makes a real princess is what’s inside the young lady. A true princess is beautiful inside. She could be the princess of England or the princess of her own family and friends. Both are a true value to everyone.
My daughter and I enjoy watching “The Princess Diaries” and the “Princess Protection Program”. Both movies show what a princess is and is not.
Who is a true princess?
A princess:
Is joyful and ready to cheer up others when they are down. When she enters a room, others can feel her happiness and positive attitude for people and the future.
She knows that one person can make a big difference in peoples lives and things are not always hopeless or bleak.
Is willing to make sacrifices for others. She puts others before her own interests. She looks for ways to improve the life of others either in her country, her family or friends.
She does not return evil for evil, but conquers it with goodness. If a princess suffers injustice or impartiality, she will look for the good and not be bitter by it.
A princess is polite and kind. She follows proper etiquette and tries to be respectful of customs that could be foreign to her.
When it comes to her presentation, she does it with grace and modesty. She is clean and orderly and maintains her physical body and health.
How the pastry tiara is made.
Now you are wondering how this tiara is made. Right?
Before I begin you should know this is not for the novice pastry baker. It takes a delicate hand and a lot of patience.
First, you will need to come up with a paper template of the princess tiara. Look for one that is simple but elegant.
You want a template that allows a place to put flavored jelly beans as gems. The openings for the gems should be just shy of a half inch.
No area of the tiara can be smaller than a quarter inch (6 mm) in width. You need some structure to hold the tiara crown after it is baked. Remember our crust is part fat. Two things will happen when it hits the oven.

One, the pastry will expand a little. So expect it to be slightly larger than your template when baked.
Two, if the fat pieces in the dough are not tiny chunks and dispersed evenly in the pastry, the tiara will not be uniform, and if the fat pieces are too big, the pastry will be thin and very brittle in some areas thus too fragile to handle.
-Be sure your fat is evenly dispersed
in the dough and in very tiny chunks.
Trace out the tiara template on a thick paper stock. Cut it out using scissors and a xacto blade for the inner spaces. Be careful not to damage your work surface with the blade.
Now the dangerous stuff. We need to make round cookie sheets, and I do not mean circles but round like a tunnel or half cylinder.
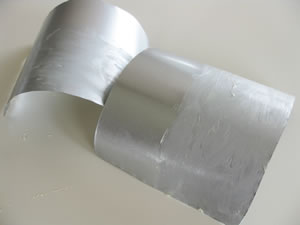
I used a cheap cookie sheet that I purchased and cut it up with tinsnips. We will need a rectangular piece of metal that is the same length as your tiara template. If it is slightly bigger that will be fine.
Please be careful. Cut metal edges are very sharp and will cut your skin easily.
Ok using some good gloves, bend the sheet metal to the radius of the pie or the head size of your princess. Do not bend just in one spot but distribute it over a wide surface.
To assist with the bending use a very large can of beans or something like it as a tool to bend the metal around.
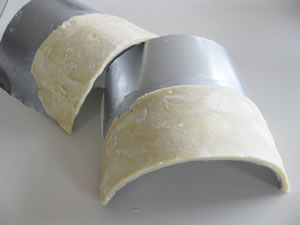
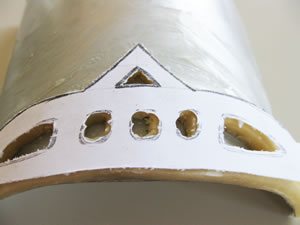
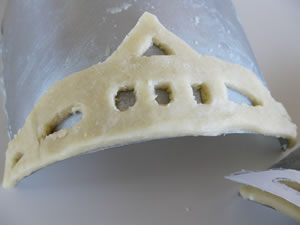
Make the radius slightly less than what is desired. The sheet metal will relax a little when heat is applied and with the weight of the pastry resting on it.
This is the fun part. Butter the round cookie sheet and refrigerate until it is very cold.
Roll out your pastry to about 1/4 inch thick and to the size of your tiara template.
Remove your chilled sheet and place the dough over the buttered section and re-refrigerate until dough is cold and hard.
Remove from the refrigerator and place your paper template over the dough. Carefully cut out the tiara using a share paring knife and a xacto blade for delicate cuts.
You will notice that your cuts will leave sharp corners and edges on the dough. You want to smooth these out a little with your finger.
This smoothing or rounding step is very important. It will help preventing the edges of the pastry from burning in the oven.
Now refrigerate it one last time. Better yet freeze it for 30 minutes. The colder and harder the dough gets the better it will hold its shape with baked.
Preheat the oven to 400. It is preferred to use a convection oven that can distribute the hot air evenly.
Place the chilled tiara dough sheet on a cookie sheet and place it in a hot oven. It will cook fast. It should take no longer than 15 minutes. Keep a close eye on it. Once it is golden, remove it gently.
Do not touch the tiara or try to remove from round cookie sheet until it is completely cool. Hot pastry is very delicate and will break and fall apart if disturbed.
Stuff the holes with very warm jelly beans as gems in the tiara. If the jelly beans will not fit, roll them on a hard surface to thin them out to fit holes.
You can now rest the decorated tiara on your pie or tack them in place with some melted white chocolate.
Have fun and decorate with glazes and frostings. Brush corn syrup or fruit jelly to give it some lustre.
Royal Tiara Pie for a princess
—Ingredients for six to eight mini pies—
Filling – White chocolate vanilla
2 cups half-and-half milk
2 tablespoons cup cornstarch
1 oz white chocolate chips
4 large egg yolks (beaten)
1/2 cup sugar
1/2 teaspoon salt
1 tablespoon unsalted butter
1 teaspoons pure vanilla extract
Filling- Raspberry syrup
1/2 cup frozen raspberries
2 tablespoons cup corn syrup
1 teaspoon cornstarch
1 teaspoon tapioca
1/2 teaspoon fresh lemon zest
Topping
White chocolate curls
1 cup heavy whipping cream
2 tablespoons powder sugar
1 teaspoon pure vanilla extract
Directions
1. Pre-baked the six inch pie crusts shell and set aside to cool.
1. Raspberry filling: Cook raspberries in a heavy pot over medium-low heat.
2. Add lemon zest, corn syrup, cornstarch and tapioca to the pot. Mix it well.
3. Let it simmer for about 10 minutes and remove from heat.
1. Cream Filling: Warm the half-and-half in a heavy non-aluminum pot over medium-low heat. Mix in the white chocolate chips. Stir with a whisk until the chips are melting. The mixture will speckle with white flakes.
2. Whisk together the egg yolks and sugar in a non-aluminum bowl. Mix until mixture is a pale yellow.
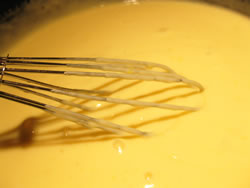
3. Add the cornstarch and salt and the vanilla. Beat it well.
4. Slowly pour the warm mixture into the yolk mixture while you are mixing. This is called tempering.
5. Return the mixture to the pot and heat until it thickens. Continue to stir mixture while it is cooking. In about 10 minutes or more the mixture will start to bubble.
6. Remove it from the heat. Add the butter and stir until smooth, about 1 minute.
7. Pour half of the cream filling into the pie crust and smooth the top with a spatula.
8. Spread your raspberry ram over the cream filling.
9. Pour the remaining half over the raspberry layer.
10. Cover the pie filling with plastic wrap. Press the plastic directly onto the surface of the filling. Let the pie cool in the refrigerator until cold and firm, 2-4 hours.
11. The topping is made using an electric mixer or a whisk. Whip the heavy cream, powder sugar, and vanilla until still peaks form. Spread the whipped cream on chilled pie.
Never over whip the cream.
It will turn it into butter.
12. For added decoration add white chocolate curls on top of the whipped cream.
13. Refrigerate until ready to serve. Let it stand for 10 to 20 minutes at room temperature before serving to take the chill off.
Royal Tiara Pie Success
If during the cutting out of the tiara the dough becomes soft, put the pastry back in the refrigerator to re-chill until hard again.
